How to make a Granny bag, today!
I was requested to make this tutorial :) Granny bag (Gramma bag) is very popular in this country, and there are so many kinds of them.
I hope you guys enjoy my tutorial :-), and hope understand my descriptions.... and I am sorry for some of pictures are out of focus (>_<). You are going to make one Granny bag, which is 8" height x 11" width x 3" depth.
There are many kind of Granny bag, so there is no rules that you should make like this.

What you need is ;
* 2 pieces of 14" x 10" fabric for front
* Same size of fabric for lining
* Same size of medium weight interfacing
* 2 of 3" strips of WOF (width of fabric : 42"-44") for Handles

I think people usually use pattern, but I don't use it. I just cut it as I desire and depends on fabric size... I am too lazy, sorry...
So, fold the front fabric in half vertically, and cut the top of it like this... as you disire.

Open it up, your front fabrics should look like this.

And cut the lining and interfacing based on the front fabric that you have just cut.
Layer the interfacing on the front fabric, wrong sides together.

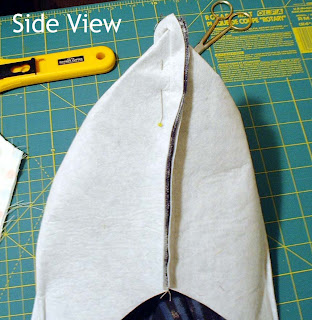
Now you are going to make tucks on the top of the bag.
Fold the front fabric in half vertically with interfacing together as interfacing up.
And sew the pointed point, it's about 1/2" in from the folded edge, sew about 2" from the top to bottom.

Open it up, and fold it again like this, and repeat sewing for 2 other places. You are going to make 3 tucks total.
And repeat for other fabric for front, and linings (total 4 pieces) too.

Flat each tucks and iron on them like this.


Put the front fabric right side together. And sew around of it like this. Repeat for the linig in the same way too.

OK.
Now you are going to make gore(depth) on the bottom of the bag.
Bring the vertical seam to the bottom seam like this and pin it. Please pay attention to put each side of sewed line them together propery. If these lines are misaligned, the shape of the bag would be warped.


Mark the line like this, and sew on the line. Repeat for other side, and lining too.

Now your bag should looks like this :-)


Turn right side out, and put the lining in the front fabric (+interfacing) wrong sides together. Pin the points.

Sew the around of edges of it, to secure all layered together. Be careful not to be poken by the pins!


OK. Now you are going to make handles!
You have 3" strips of WOF for handles, don't you?
Sew them together, because one strip doesn't have enough length for handles. And fold it in half, iron it.

Layer the handle on the top of the bag like this, and sew them together for piping.

Turn the handle fabric up to the front side like this, pin it, and sew on it.

Now your bag should look like this :-)

I think you have your own favorite handle length.
Let's put the fabric for handles around the top of the bag in person roughly to decide the length.


Cut the extra part of the fabric for handles, and sew them together. you should have one round fabric for handles.
Place it on the right/left side of the bag like this.
Oops! Please don't mind about the beer can near by the bag! Actually I love beer. It bring me in good mood, and I am almost in the heaven when I am in my sewing room with beer, sewing and drinking... how nice. And the bathroom is just in front of my sewing room! ha-ha-ha.

Find the half point of the handle fabric, and put it on the other side of the bag. Pin it along the edges like this.

This is how it looks like after you sewed the edges on the sides.

Turn the handle fabric up to the front side like this, pin it, and sew on it.


This is all pinned. Sew carefully making sure how the wrong side looks fine.

Done!
Did you enjoy to make the bag??
I was requested to make this tutorial :) Granny bag (Gramma bag) is very popular in this country, and there are so many kinds of them.
I hope you guys enjoy my tutorial :-), and hope understand my descriptions.... and I am sorry for some of pictures are out of focus (>_<).
 You are going to make one Granny bag, which is 8" height x 11" width x 3" depth.
There are many kind of Granny bag, so there is no rules that you should make like this.
 What you need is ;
* 2 pieces of 14" x 10" fabric for front
* Same size of fabric for lining
* Same size of medium weight interfacing
* 2 of 3" strips of WOF (width of fabric : 42"-44") for Handles
 I think people usually use pattern, but I don't use it. I just cut it as I desire and depends on fabric size... I am too lazy, sorry...
So, fold the front fabric in half vertically, and cut the top of it like this... as you disire.
 Open it up, your front fabrics should look like this.
 And cut the lining and interfacing based on the front fabric that you have just cut.
Layer the interfacing on the front fabric, wrong sides together.
 Now you are going to make tucks on the top of the bag.
Fold the front fabric in half vertically with interfacing together as interfacing up.
And sew the pointed point, it's about 1/2" in from the folded edge, sew about 2" from the top to bottom.
 Open it up, and fold it again like this, and repeat sewing for 2 other places. You are going to make 3 tucks total.
And repeat for other fabric for front, and linings (total 4 pieces) too.
 Flat each tucks and iron on them like this.
 Put the front fabric right side together. And sew around of it like this. Repeat for the linig in the same way too.
 OK.
OK.Now you are going to make gore(depth) on the bottom of the bag.
Bring the vertical seam to the bottom seam like this and pin it. Please pay attention to put each side of sewed line them together propery. If these lines are misaligned, the shape of the bag would be warped.


 Mark the line like this, and sew on the line. Repeat for other side, and lining too.
 Now your bag should looks like this :-)
 Turn right side out, and put the lining in the front fabric (+interfacing) wrong sides together. Pin the points.
 Sew the around of edges of it, to secure all layered together. Be careful not to be poken by the pins!
 OK. Now you are going to make handles!
You have 3" strips of WOF for handles, don't you?
Sew them together, because one strip doesn't have enough length for handles. And fold it in half, iron it.
 Layer the handle on the top of the bag like this, and sew them together for piping.
 Turn the handle fabric up to the front side like this, pin it, and sew on it.
 Now your bag should look like this :-)
 I think you have your own favorite handle length.
Let's put the fabric for handles around the top of the bag in person roughly to decide the length.

 Cut the extra part of the fabric for handles, and sew them together. you should have one round fabric for handles.
Place it on the right/left side of the bag like this.
Oops! Please don't mind about the beer can near by the bag! Actually I love beer. It bring me in good mood, and I am almost in the heaven when I am in my sewing room with beer, sewing and drinking... how nice. And the bathroom is just in front of my sewing room! ha-ha-ha.
 Find the half point of the handle fabric, and put it on the other side of the bag. Pin it along the edges like this.
 This is how it looks like after you sewed the edges on the sides.
 Turn the handle fabric up to the front side like this, pin it, and sew on it.
 This is all pinned. Sew carefully making sure how the wrong side looks fine.
Done!
Did you enjoy to make the bag??
merci beaucoup pour ce tuto!!!
ReplyDeletej'aime découvrir votre site...
i will try
I hope you enjoy it :-D
ReplyDeleteI love your tutorial, I am also one of them that don't draw pattern :p
ReplyDeleteHope I can sew something after understand your tutorial ^ ^
Thanks for leaving a comment. It is just troublesome to draw pattern, isn't it? :-p
ReplyDeleteHope you enjoy making the bag :)
very great tutorial!
ReplyDeleteThank you! Hope you enjoy making it :)
ReplyDelete