My friend Mai - mairuru - let me know about this project!
I am going to show you how to make a drawstrings bag that you see below.
The dimension is approx. 7" tall x 4" wide x 4" depth.


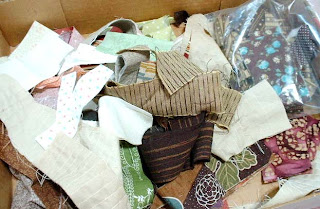
When I think of "Scrap", it means my tree applique for me!

I store circles like this when I got small fabric pieces. As you can imagine..., I have tons of stash which can be turned into the circles!
 And here is for trees.
I am a person who cannot throw away even tiny pieces of fabric. YES, so my sewing room is really messy :( I periodically clean my room but those pieces of fabric make piles soon.
OK.
Let's start to make the drawstrings bag!

Here, what you will need is :
* 1 piece of 16.5"x8" for the body
* 1 piece of 16.5"x2.5" for the top of the body
* 2 pieces of 8"x2.25" for strings
* 1 piece of 16.5"x10" for lining
* 2 strings of 21"
* 1" diameter circle pattern made with cardboard
Pick up some fabrics for tree, and see balances of trees on the front fabric as you like.
Leave empty space approx. 2.5" from the bottom.

Fold the pieces and iron them like this,

Both top and bottom will be folded like this.

Place them on the front fabric seeing balance you would like, and pin them.
Then, pick up some circle fabrics and again place them seeing balances and colors...

OK, You are now going to make circles for applique.
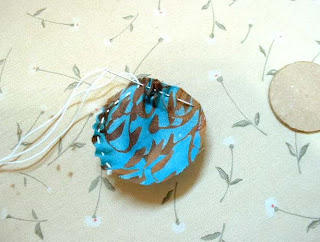
Make small running stitches around the circle, smaller stitches are better to make smooth curve. From the right side push a needle in so that it would make easier for the next procedure.

And put 1" diameter circle pattern on the fabric,

Pull the thread, iron on it paying attention to not loose the thread.

Then, loose the thread a little to remove the cardboard pattern from inside of it, and fix the shape pulling the thread a little, then iron on it again. Cut the tread.

Make other circles in the same technique.

OK, place them as you desire, again seeing balance.

And sew them using blind stitch.

Now, you are going to construct the front part of the drawstrings bag.
Here is the layout.

Put the piece of 16.5"x2.5" for the top of the body on the main body fabric right side together, and sew the blue line, seam allowance is around 1/4".

Open it after sewing and iron it, place the lace on the join line, and sew it together.

Now, you are going to work on the part for a tunnel of strings.
Fold the both shorter edges triple like this,

And sew them, then fold them in half, iron them.

Place them on the body fabric like this.

Here is the layout for reference. (Please click it to see the bigger image.)

It looks like this when you place the tunnels on the body fabric.

Put lining onto it right side together, and pin them, then sew the blue line you see below.

It looks like this after you sew when it is opened up.

Then fold it in half like this paying attention to match each lines of seam. Leave an opening or about 2.5" when you sew the lining. You need to turn inside out from this opening.

Then, open up the seam allowance after sewing, place it at the center of width and iron on it.

OK, now you are going to fold the both opened edges like this that you see below.

It is easier to make this folded shape when you pin the center to hold the layers.
Tuck the both loop sides to the center.

And fold it in half like this.

And sew the layers together with 1/4 seam allowance from the edge.
Then, turn inside out from the opening you left on the lining.
Close the opening using blind stitch.

Here is what you get after all of works!

Inside looks like this.

And the bottom looks like this.

Finally!!
Let 2 of strings through the both tunnels.
From right side, let it through in one of the tunnel and come back through other tunnel from the left side, tie the string together. Do in the same way from the left side, too, and tie them together.
It's done!

Thank you very much for reading through this tutorial! Hope this would make you to feel that you would like to make it. If so..., please enjoy it! :)
It's so cute! And the instruction is very clear.
ReplyDeleteI like your way to put circles.
Mai (* v *)!!!!!
I love this bag - great design. Can't wait to make one for myself!
ReplyDeletevery cute bag and great tutorial!
ReplyDeleteSo cute! Thanks for the fantastic tutorial.
ReplyDeleteI love this. It's one of my favorites in the Scrap Buster Contest so far. I can't wait to try it out. Thanks for sharing.
ReplyDeleteThis is so cute.:)
ReplyDeleteHi
ReplyDeleteGreat bag and an even better tutorial! Love the way you have made the tutorial. Very useful. Thanks
Tretha
Hi Kyoko, it's gorgeous! I hope I find some time to do it! thanks a lot!
ReplyDeleteIts Lovely, I am going to make myself one for christmas
ReplyDeletethank you for posting the tutorial
wendy from Uk
Thank you so much for leaving a lovely comment, everyone!
ReplyDeleteHope you enjoyed to make this drawstrings bag :)